Creating SharePoint Site Templates
Creating SharePoint Site Templates was not initially available while rolling out the modern interfaces for mobile friendly site pages. Immediately, we found out that we had to resort to creating sites from scratch manually.
With the introduction of modern SharePoint Site Templates, we now have the ability to perform basic customization of site designs in terms of Logos, Themes, Lists, Fields, Content Types, and Flows. We can use SharePoint Online Management Shell to provision these reusable site designs.
We also find that we have the ability to control who can create sites using these designs and well as remove an existing design.
These templates work by initiating a series of actions and creating site objects based on the predefined values. The provisioning can take place via PowerShell or the REST API.
Creating SharePoint Site Template Prerequisites
- Ensure you have downloaded the latest version of SharePoint Online Management Shell. The features available through this management shell are constantly evolving so it is always important to get the latest version.
- Connecting to your tenant via SharePoint Online Management Shell.
Creating SharePoint Site Template Process
- Login as a SharePoint or Global Administrator
$username="user@contosoto.com"
$userCredential = Get-Credential -UserName $username -Message "Enter password."
Connect-SPOService -Url https://contoso-admin.sharepoint.com -Credential $userCredential
- Register your provisioning script containing your actions. Copy the ID from the output of the script registration.
$site_script = @'
{
"$schema": "schema.json",
"actions": [
{
"verb": "createSPList",
"listName": "Customer Tracking",
"templateType": 100
}
],
"bindata": { },
"version": 1
}
'@
Add-SPOSiteScript -Title "Customer Site" -Content $site_script -Description "Creates a site for tracking customer information"
- Apply the new design script to your O365 tenant
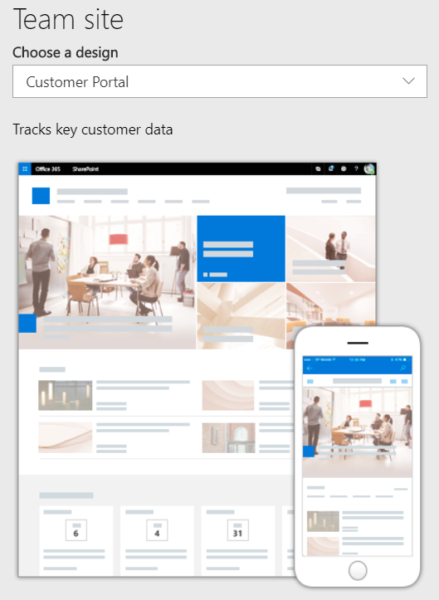
Add-SPOSiteDesign -Title "Customer Portal" -WebTemplate "64" -SiteScripts "258e030b-9745-403e-8460-17b4bb563be4" -Description "Tracks key customer data"
- Navigate to the SharePoint Landing Page (/_layouts/15/sharepoint.aspx)
- Click Create Site
- Choose Team Site or Communication Site
- From the drop down list, choose the newly created custom design (i.e. “Customer Portal”)
- Provide the site information and click Next and Finish.
- Site Name
- Site Description
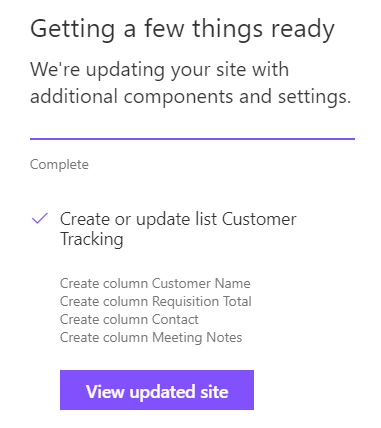
- When finished, you can view the status of your actions as they finish provisioning. Here, you will find a summary of the steps performed as the site is being provisioned.
- Select View Updated Site to navigate to the newly created site.